Friday, June 18, 2010

Busy days and Chocolate Chip Oatmeal Cookies

I’m fortunate that with the summer months, my schedule is changing again to a more relaxed pace, but even that is only for the time being; who knows what next week will bring? And what if I'm suddenly in a crazy flurry of goings-on, and I don't have time to look around the cookbooks for a good recipe to bring to tonight's potluck? Well, that's a luxury problem, for sure. But even knowing that, that’s why I like to have a list of dessert recipes that I can count on, that have been tried and revised. These are the sweet treats I can make for my own home for a few days, or for friends and group events where food is always brought along. For me, this list contains a fair share of cookies, all of which have previously been presented against discriminating taste-testers, and have received praise and the smiles of individuals who have sampled a truly delicious dessert.

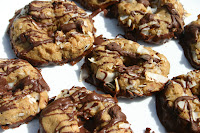
One of the recipes that I have recently added to this exclusive repertoire is a chocolate chip oatmeal cookie. This cookie is admittedly a simple one, but in the past week, it’s received stellar reviews from a mixed audience, those ranging in age from 5 years old to those in their 60s. Cookie-lovers and those lacking the all-important sweet tooth found these cookies more than delightful, and I am in agreement.

I found that these cookies are best eaten the day of or the day after baking; two days later, and they were already losing their quality. But, even still, on the second day, there was the same crispness and the same subtle sweetness as the day before, and there was not anything wrong with the ones that had lasted more than one day. I used milk chocolate chips for this recipe, which I think gave the cookies a bit more of a sugary taste, but not in an overbearing way at all. And the measurement of oats – 3 cups – was ideal: not such a small bit that they got lost in the dough, nor an excessive amount. I’m happy to keep this recipe on hand for the emergency cookie days, when I know I need to whip up a batch of something delicious, but there simply is not enough time for experimentation.


Chocolate Chip Oatmeal Cookies

Yield: About 3 dozen

Ingredients:
1 cup butter, softened
1 cup brown sugar
½ cup evaporated cane juice
2 eggs
2 tsp. vanilla extract
¾ cup unbleached white flour
¾ cup whole-wheat flour
½ tsp. baking soda
1 tsp. salt
3 cups quick oats
1 cup chocolate chips

Directions:
1. Preheat oven to 325º F.
2. In a large bowl, mix together the butter, brown sugar, and cane juice. Add the eggs and combine, then mix in the vanilla extract.
3. In another bowl, whisk together the flours, baking soda, salt. Gently stir in the oats. Add the dry ingredients to the butter and sugar mixture, and mix well. Stir in the chocolate chips. If desired, refrigerate dough for ½ hour – 2 hours.
4. Scoop dough by the tablespoonful onto baking sheets. Bake for 12-14 minutes. Cool on wire racks.

Thursday, May 20, 2010

Homemade Samoas™

My favorite Girl Scout cookie is the Samoa™; I love the blending of coconut and chocolate, I love the rich dark chocolate, I love their shape. However, there are a couple of things I do not love about Samoas™, so when I saw this recipe for homemade Samoas™, I couldn’t wait to try them out.

The preparation was a meditative delight, and it brought me working with dough and melted chocolate. Be ready to get your hands dirty making these. And when they had cooled, and I took my first bite of these homemade treats, I knew I had found a recipe that will forever stay in my lexicon. Although these are vegan cookies, don’t think that you must be a vegan to enjoy these; they are amazing, and the reception I received from my group of taste-testers was overwhelming. They implored me to make another batch as soon as possible. And if you are vegan, then these are a perfect egg and dairy-free cookie to bake and share with vegans and non-vegans alike. The addition of coconut oil, as opposed to any other type of fat, fits in so well with the coconut flavor, and helps to make the cookies even more wholesome.

As a side note: the coconut I used was rather broad, and I did not chop it up into smaller bits. For a more authentic homemade Samoa™, go for the finely shredded variety of coconut (unsweetened!).


Homemade Samoas™
From Vegan Cookies Invade Your Cookie Jar

Yield: About 1 dozen

Ingredients:
2 cups finely grated unsweetened coconut
1/3 cup unrefined coconut oil
¾ cup packed brown sugar
1/3 cup milk
1 Tbsp. ground flaxseeds
1 ½ tsp. vanilla extract
1 cup unbleached white flour
¼ tsp. baking soda
½ tsp. salt
For topping:
1 cup semi-sweet chocolate chips
2 Tbsp. unrefined coconut oil

Directions:
1. Preheat oven to 350º F. Line a baking sheet with parchment paper.
2. In a large heavy skillet, toast the coconut over medium-low heat. Stir occasionally until coconut is a light golden brown. Remove from heat.
3. In a large bowl, blend the coconut oil, brown sugar, milk, flaxseeds, and vanilla extract. Add flour, baking soda, and salt, and mix well. Fold in the coconut.
4. Scoop 1 tablespoon of dough and roll into a small ball, then flatten and place on the baking sheet. Work a small hole into the center. Repeat until all the dough is used. Bake for 8-9 minutes. Let cookies cool.
5. Melt chocolate chips and coconut oil in a double boiler. Let the mixture cool slightly. Dip cookies bottoms in the chocolate and return to the baking sheet. With a fork or a pastry bag, drizzle the remaining chocolate over the tops of the cookies.
6. Chill the cookies in the refrigerator, or let sit, until chocolate is set.

Thursday, May 13, 2010

Strawberry Rhubarb Pie Season

The first strawberry rhubarb pie of the season is always such a welcome treat. Whether it comes from the bakery, a friend’s oven, or my own kitchen, I look forward to the delicious flavor that these two fruits work together to achieve. The good news is that this pie can really be made year-round, with frozen strawberries and frozen rhubarb. But still, nothing beats fresh fruit in a pie. I like how the filling in this strawberry rhubarb pie is quite straightforward, and everything needed was already on hand in the pantry. Tapioca or arrowroot starches are a substitute for corn starch, so that can be used instead if that is what’s available.

And this pie crust was a definite success: flaky and buttery, but without being too heavy. I’m still working on my pie-making skills, so my lattice tops are not anywhere near perfection; that’s why I like to do a dough crumble to top the pie. But practice would certainly lead to much prettier pies, so maybe with the bounty of summer fruit on its way, I can work a bit harder on my pastry skills. No matter how it looks, though, this sweet and tart pie is absolutely satisfying; I’m already looking forward to making another one.

Strawberry Rhubarb Pie

Adapted from Nourishing Traditions

Yield: 1 9-inch pie

Ingredients:
Flaky Pie Crust-
1 1/3 cups unbleached white flour
Pinch sea salt
Pinch sugar
½ cup unsalted butter, chilled and diced
2 egg yolks, slightly beaten
3 Tbsp. cold water
Filling-
2 cups rhubarb, cut into ½ inch pieces
2 cups strawberries, sliced
½ cup whole cane sugar
2 tsp. cinnamon
2 Tbsp. tapioca starch or arrowroot
2 Tbsp. butter

Directions:
Crust-
1. In a medium bowl, sift together the flour, salt, and sugar. Cut the butter into the flour mixture until crumbly. Add the egg yolks, then the cold water, and immediately blend together well, preferably with your hands.
2. Turn the dough onto a large sheet of wax paper and form into a ball. Wrap it up, and refrigerate for at least 4 hours.
Pie-
1. Preheat oven to 450º F. Place the rhubarb and strawberries into a large bowl. Add the sugar, cinnamon, tapioca starch and toss together. Let stand for 15 minutes.
2. Remove dough from refrigerator. Butter or grease a 9-inch pie plate. Roll out the dough and press into the pie plate, reserving some for the topping of the pie.
3. Fill the pie crust with the filling, and dot with small pieces of butter. Top with lattice work or dough crumbles.
4. Bake at 450º for 10 minutes. Reduce heat to 350º and bake another 35-45 minutes, watching it carefully for the last 10 minutes. The crust should be brown, the filling should be bubbling slightly. Let cool, and serve warm or cold.

Wednesday, May 5, 2010

Buckwheat Scones

It’s always fun to try out a new type of flour, and see how its unique characteristics translate into a baked dish. This was my first time using buckwheat flour, and although a part of me wanted to make buckwheat cookies, I decided to try something that I would be able to eat for breakfast the next morning. That’s not to say that cookies cannot be a breakfast item, but I had a very specific intention in mind with these. Before I get out in the morning to do a day of gardening, I like to have a filling and wholesome breakfast; if I eat too much sugar in the morning, then I end up feeling overfull and slightly off-balance. But these scones, while sweetened with a bit of brown sugar, do not overwhelm. They provided me with a hearty satiation, as opposed to a heavy bloat.

The buckwheat gave the scones an earthy quality, and the slight addition of flaxseeds added to the nuttiness of the flour. And after I did a little research on buckwheat, I found out what a nutritional and fiber-full grain it truly is. Not only is it high in dietary fiber, but also in manganese and magnesium, and it’s been said to help lower cholesterol levels and blood pressure. I think the next step would be to get some buckwheat groats and prepare it as a breakfast cereal. For a quicker morning meal, these scones were filling and delicious, and I could feel the positive energy from the buckwheat helping me through my morning work.

Buckwheat Scones

Ingredients:
1 cup unbleached white flour
½ cup whole wheat flour
2/3 cup buckwheat flour
½ tsp. sea salt
1 Tbsp. baking powder
1 Tbsp. ground flaxseeds
6 Tbsp. unsalted butter, chilled and diced
1 egg
¼ cup brown sugar, packed
½ cup rice milk
½ cup dates, chopped
Cinnamon and sugar for sprinkling

Directions:
1. Preheat oven to 400º F. Line a baking sheet with parchment paper.
2. In a large bowl, whisk together the flours, salt, baking powder, and flaxseeds. Cut in the butter and blend until there are course crumbs.
3. In a small bowl, mix the egg, brown sugar, and rice milk. Pour this mixture into the flour mixture, and blend well. Stir in the dates.
4. Turn the dough onto the prepared sheet, and shape into a circle, about ½ inch thick. Cut the dough into 4, 6, or 8 wedges, and sprinkle with cinnamon and sugar. Bake for 20 minutes, and cool on a wire rack.

Thursday, April 29, 2010

Gluten-Free Coconut Macaroons

Coconut macaroon recipes are not terribly difficult to find, and when I saw this one for Gluten-Free coconut macaroons, I hesitated for a moment and wondered if not most coconut macaroon recipes were actually gluten-free. As I looked into several other recipes, it looks like a good handful are. But these particular macaroons do call for flour in the recipe, and so brown rice flour is used to make the cookies free of gluten. The result of adding flour and eggs to a macaroon recipe is a much cakier concoction, and these did turn out quite rich. I made one batch of smaller macaroons, and one of larger macaroons, and given the texture and strong coconut taste, I preferred the smaller cookies. Of course, the coconut and the chocolate make a terrific flavorful combination, and I like the browned edges. I did keep a close eye on them toward the last few minutes, though, so that I did not cross the fine line into burned macaroons.

Gluten-Free Coconut Macaroons

Yield: 2 dozen

Ingredients:
2 eggs
2/3 cup agave nectar
1/8 tsp. sea salt
2/3 cups brown rice flour
1 tsp. vanilla extract
3 cups sweetened shredded coconut
½ cup semi-sweet chocolate chips (gluten-free)

Directions:
1. Preheat oven to 350° F. Cover two baking sheets with parchment paper.
2. In a large bowl, whisk together the eggs, agave nectar, sea salt, flour, and vanilla extract until well-blended. Stir in the coconut and then the chocolate chips.
3. Drop the dough by the tablespoon-full on the prepared baking sheets. Bake 12-15 minutes, until they are golden brown around the edges. Cool on the baking sheets.

Thursday, April 22, 2010

Rhubarb Mini-Muffins

Spring has always had a special place in my heart, and after chilly, dreary winters, there's something magical about sunny days and warm breezes. But now that I'm living on a farm, I'm experiencing a whole new dimension to the season. I walk through the gardens and see evidence of life that has been dormant all winter, finally flourishing in the milder temperatures. In the greenhouse and cold frames are burgeoning little plants, many of which I started from nothing more but a tiny speck of a seed. I have pots of chard, kale, and broccoli on my deck, and already there are strong leaves and bright colors, indications of health. What a truly awesome sight!

For the past two years, I have been eating more seasonally, in a way, but not very intentionally. I've been buying the produce that looks good, and I know that fresh raspberries in January are not the best choice to make. But I haven't been paying much attention to which vegetables are growing each month, and when the best time for them are. However, I recently saw two beds in the garden that were lush with leafy looking greens, though I had no idea what lived there. When I looked closer, I saw that these glorious plants were rhubarb. I had never really known when rhubarb was in season, and I've only been cooking with it for the past year or so. But here, steps from my home, was rhubarb, ready to pick and eat (although, do not eat the leaves of a rhubarb plant - they are toxic to humans).

I saw very clearly how the rhubarb is in season, and so I picked some stalks and thought about what I would do with them. I found an interesting idea for rhubarb muffins, and so I put together a batch of these seasonal mini-muffins for my Kindergarten class. Although they were not quite as excited as I was about the idea of rhubarb muffins, everyone still enjoyed them. The rhubarb is not too strong, and there is enough sweetness in the muffins to give them a balanced taste, perfect for snack time or breakfast time.


Rhubarb Muffins

Yield 1 dozen muffins or 2 dozen mini-muffins

Ingredients:
1 ½ cups all-purpose flour
1 cup whole-wheat flour
¾ cup packed brown sugar
1 tsp. salt
1 tsp. baking soda
1 tsp. ground cinnamon
1 egg, lightly beaten
1 cup buttermilk
2/3 cup vegetable oil
1 tsp. vanilla extract
2 cups finely chopped rhubarb
Topping:
2 Tbsp. whole cane sugar
2 tsp. ground cinnamon

Directions:
1. Preheat oven to 375 ° F
2. In a large bowl, combine flours, brown sugar, salt, baking soda, and cinnamon. In a separate bowl, combine egg, buttermilk, oil and vanilla.
3. Stir the buttermilk mixture into the dry ingredients until moistened. Fold in rhubarb. Fill paper-lined muffins cups about half full. Combine topping ingredients and sprinkle over each muffin. Bake for 15-18 minutes.

Thursday, April 15, 2010

Maple Coconut Bar Cookies

Somewhere, in a bakery that I cannot remember, I tried a sandy and maple-y bar cookie. While I do not recall where I ate the bar cookie, I do remember the rich maple flavor and the buttery cookie base. I recently came across a recipe for maple cookies, and remembering this one maple bar I once had, I decided to play around with this recipe and see what I could come up with.

I really enjoyed the addition of coconut to these cookies, an ingredient I decided to stir in on a whim. The cookie itself is not too sweet, but it does have a delicious buttery taste that goes well with the subtleness of brown rice flour. They have a much more cakey texture, as opposed to a shortbread sandy-ness. And as far as the maple: It was definitely present, and it gave a light, lovely taste, but if I wanted to make these bars really maple-y, I could have added a teaspoon of maple extract, in place of one teaspoon of vanilla extract. Even still, these were no disappointment. They were a simple bar cookie to bake up, and respond well to some experimentation.


Maple Coconut Bars

Ingredients:
½ cup butter, melted and cooled
¼ cup evaporated cane juice
½ cup maple syrup
2 tsp. vanilla extract
1 large egg
1 cup brown rice flour
¼ tsp. sea salt
1 cup shredded coconut

Directions:
1. Preheat oven to 350° F. Lightly grease an 8-inch square baking dish.
2. In a large bowl, combine butter, sugar, maple syrup, vanilla and the egg and whisk until smooth. 3. Add in flour and salt, then add in coconut and stir. Spread into prepared baking dish.
3. Bake for 20-25 minutes, until set and lightly browned.
4. Cool in pan on a wire rack.